|
Help Guide...
Welcome to our help guide.
BLEEDS: Edge-to-Edge printing
AUTOMATIC BOOKLET CREATION using InDesign
FILE FORMATS
BLEEDS: Edge-to-Edge printing
If all or parts of a design are intended to print right upto the edge of the finished sheet, those areas are said to ‘bleed’ off the edges. For example, any background block colour, photo or design element. To achieve the desired result, these elements should extend beyond the finished edge of the sheet by at least 3mm within the artwork provided, where they are then trimmed off after printing.
Additionally, any text should be positioned no closer than 4mm from the final printed edge.
These designs need to be printed on stock that is larger than the final finished size, and the layout should therefore include crop marks indicating where the trimming should take place.
The artwork should be provided to us as a high resolution PDF for print purposes. Please see the example below:
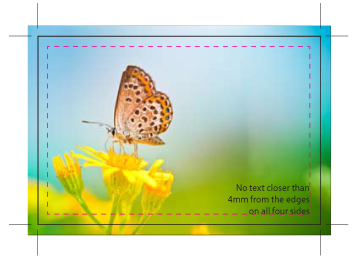 |
Background photo is extended by 3mm on all four sides. Crop marks are added in each of the four corners. Text is positioned within 4mm from the edge ( as denoted by dotted line). |
 |
Finished Result:
The 3mm extra is trimmed away to give a 85 x 55mm layout with full bleed to all four sides with text elements neatly positioned from the finished edges. |
________________________________________________________________________________________
Automatic Booklet Creation - using InDesign
Booklets that are folded and stapled in the middle should have a number of pages that are multiples of 4.
Eg: 4, 8, 12, 16, 20, etc. Note that if, for example, you have created a 7-page layout, then 1 extra page would need to be included - which could be blank.
BLEEDS
Any background colours or photographs that are to extend to the edge of the finished booklet should fill into the bleed area (denoted by a red box around the outside of the document area view). Any text should not extend outside the minimum margin area of 6mm.
For example - see the diagram below:
Using Facing Pages View, the example shows an image crossing two separate pages in booklet at the bottom. The image extends into the bleed area on the outer edges.
Also shown is a single image that stops at the centre margin but extends into the bleed area on the outer edges.
Note that the text is constrained within the (minimum 6 mm) margin area, denoted by the pink inner boxes.
1) Create an A5 portrait document with FACING PAGES PAGE VIEW. Set the required number of pages that are divisible by 4. Set margins at a minimum size of 6mm. *Set all Bleeds at 3mm (if needed) -this is found under ‘more options’.*
2) Design each page in start-to-finish order (ie. cover, page 1, 2 etc upto outside cover). Pay attention to bleed areas, constraints on text positioning within minimum margins etc. as above.
3) When ready to create pdf for print, perform the following steps:
1) Create outlines of any unusual fonts.
2) Choose ‘File’ - ‘Print Booklet’
3) Choose ‘Set up’
4) Select ‘2-up Saddle Stitch’
5) Check the box ‘Automatically adjust to fit marks & bleeds’
6) Check the box ‘print blank printer spreads’
7) Click ‘Print settings’ - select ‘Adobe pdf’ as your printer
8) Choose ‘Set up’ from LEFT HAND MENU
9) Choose ‘Paper size - Custom’ :
For A5 portrait booklet enter 320mm & 225mm
For A4 portrait booket enter 450mm & 320mm
For A5 Landscape booklet enter 440mm & 170mm
10) Choose ‘Portrait’ orientation
11) Select ‘Scale 100%’, and ‘Centred’ for page positioning
12) Choose ‘Marks and Bleeds’ from LEFT HAND MENU
13) Check the box ‘Crop marks’
14) Check the box ‘Use document bleed settings’
15) Click ‘ok’
16) Choose ‘Preview’ to check your pages will print in the correct order
17) Print to pdf - High quality print.
Your pdf should present as a landscape document, with all pages in correct ‘Printers Doubles’ order, with bleeds and crop marks included.
________________________________________________________________________________________
Manual Booklet Creation - (for advanced users only)
To successfully print a booklet that is folded and stapled in the middle, the total number of pages should be divisible by four. If this is not possible, then the result will be that blank pages will be left either at the front or back of the booklet.
The term ‘Printer’s Doubles’ is a description of how the artwork is constructed so that all the pages are correctly positioned from start to finish within the booklet. An example of an 8-page booklet - WITHOUT BLEEDS - is set out below:
Imagine the booklet is unfolded and unstapled, and each separate sheet is flattened out in front of you. The sheets will appear as follows:
 |
A 16-page booklet would
be constructed as follows:
| 16 |
1 |
| 2 |
15 |
| 14 |
3 |
| 4 |
13 |
| 12 |
5 |
| 6 |
11 |
| 10 |
7 |
| 8 |
9 |
|
If your design includes Bleeds, your layouts should be constructed as follows:
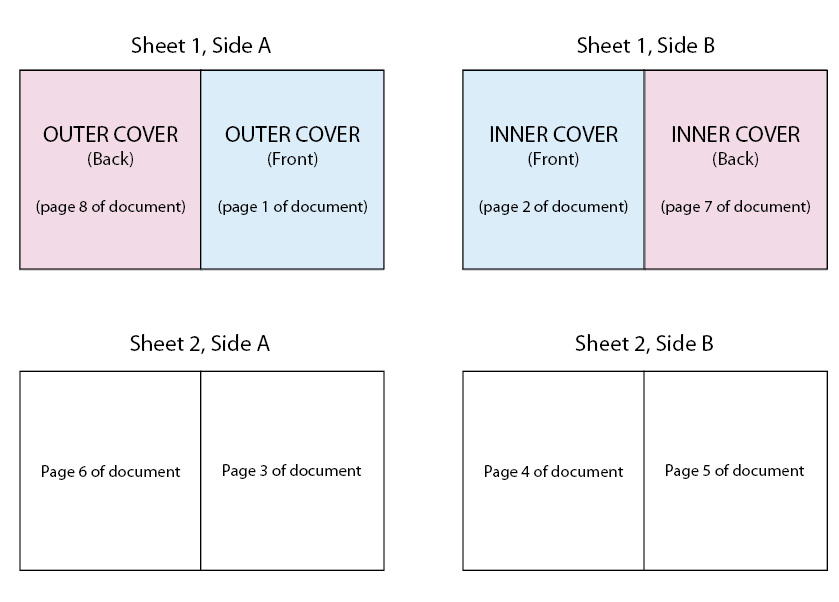
Any backgrounds or images that extend over the whole spread or cover can be constructed as per the outer cover example below. Any pages with DIFFERENT bleeds on all four sides should be extended on THREE outer edges but NOT the centre edge, as per the inner cover below. Other individual elements within your booklet that bleed should be extended as needed, as per pages 3 and 6 of the example below. If your booklet contains SPREADS they should be divided at the centre edge so they will meet together when the booklet is assembled - as per pages 4 & 5 of the example below.
|